If you love Avatar: The Last Airbender and have always wanted to have a go at creating your own Aang cosplay, or if you hadn’t thought of it before and now you’re thinking, “Actually, that sounds sick,” here’s your chance. Instagram influencer and cosplayer tipsy_pig, otherwise known as S. Harriet Rhodes, shares her step-by-step instructions for making Aang cosplay her way – with design illustrations, patterns, and tips thrown in. Needle, thread, and glider staff at the ready…
Aang’s Clothing
Aang had several outfit changes across the three seasons of Avatar: The Last Airbender. Whether journeying to a destination or on the run, the Chosen One has at times been compelled to wear disguises or alternative attire, depending on the circumstances. While he begins the series in the traditional clothes of the monastic Air Nomad children, signifying the beginning of his journey and his immaturity, he closes it wearing his iconic one-shouldered shawl/sash ensemble.
This outfit is equally symbolic. Part senior Air Nomad monk uniform, it indicates Aang’s growth, maturity and beefier skillset as the final battle and series finale approaches. It’s also part battle suit – we see him ritualistically emerge wearing these new clothes as the group gears up to take on the Fire Lord during Book 3. The same sequence sees Aang’s allies also adopt their own battle “armour” — including flying bison sidekick, Appa. For Aang, his suit is the clothing of the fully-fledged Avatar, ready as he is to put his knowledge and abilities to use and save the world. It’s significant that his Avatar outfit also comprises the Fire Nation clothes he “borrows” from a washing line in Season 3 Episode 2 – notably, the trousers and boots. The Avatar, of course, has mastery of all four bending abilities – air, water, earth and fire – and must become proficient in all in order to fulfil his destiny.
Of course, practically, Aang was in need of new clothes since his get-up was shredded in the fight with Azula in the Season 2 finale. And he couldn’t wear his Fire Nation disguise forever. But that’s a bit too prosaic an explanation for us.
How To Make Aang Cosplay
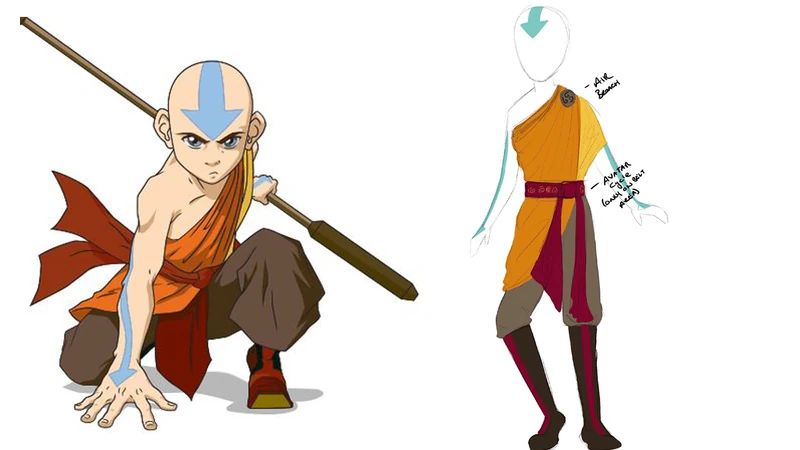
1. Design the costume
First, Harriet designed the outfit, so you should too. Alternatively, you can use her design. She sketched the final look, so she had an image of the finished build to refer back to, and so she could work out what alterations and additions she felt she needed to make. Harriet wanted to include the Avatar Cycle emblems on the belt, and add in an Air Nomad brooch, which, practically, helped to both conceal seams and hold everything in place, and also reflected the pendants senior monks wore. You can also incorporate these into your costume.
It’s a great idea to write down the measurements you need to work to on this initial design, or, like Harriet, you could make copies of your sketch to help keep your build easier to track. The following diagrams illustrate the measurements you need to take so you can work out how much fabric you need for each component.
2. Make Aang’s shirt
Aang’s one-armed shirt and overall appearance is meant to echo the Dalai Lama’s look, as are the Air Nomad colours he wears. This conveys the idea of a fully accomplished Avatar, and aligns Aang with other characteristics of the Buddhist spiritual leader.
“I wanted the shirt to be comfy and practical for long periods of time, such as at cons. So I did a one-armed shirt with a separate segment sewn over the top — giving the illusion of his shirt,” says Harriet. This means you can minimise layering that could be potentially become uncomfortable and hot.
Aang’s yellow shirt is a basic wrap of fabric, but this isn’t very workable when you need to wear the costume for any length of time and actually move around in it.
To make a basic one-shouldered tank, cut two pieces of fabric from a length of yellow breathable cotton according to your personal measurements (as taken in the step above) and the pattern (left) below. The second piece you cut should mirror the first so that when you sew them together, they create the front and back sides of the top. Following the pattern, sew together along the sides and top, leaving the neckline, armhole and bottom of the garment open. Hem along the bottom and the armhole.
To make the draping sleeve segment, follow the pattern on the right, shown above. Using the measurements indicated, cut two rectangular pieces of fabric from the same yellow cotton material and sew them together along all the sides, bar one of the short sides. Turn the fabric inside out and then sew the open side closed. You should now have a neatly finished rectangle of fabric ready to sew onto the basic shirt piece.
Lay your fabric rectangle over the shoulder of the undershirt, with the centre of your length of material sitting at the top of the shoulder. You should have one side draped down the front of your shirt, and one draped down the back with the ends loose. Now you need to attach this piece.
On each side of the top, tack the piece of fabric to the centre of the shirt along the short edges at the corners only, as seen in the image below.
Then stitch it at the top where it folds over the shoulder to the shoulder of the undershirt, as seen here:
“This allows full range of movement,” says Harriet. “Make sure the sleeve segment is sewn in the centre of the front and back, as this will ensure the wrap covers where it joins.”
3. Make Aang’s wrap
Start with approximately two metres of orange fabric — you might need slightly more or less depending on your shoulder to knee measurement. Hem the material along every edge, and then add pleats to the two shorter ends. This can be done fairly easily using a fork. Watch the technique in the video below.
Next, fold your fabric in half lengthways so it fits neatly on the shoulder. The pictures below illustrate the pleats and folded fabric, which is then folded up on itself to create a loop, or sash.
Sew the two pleated ends together. You’re left with a beautifully draped wrap-effect that you can slip across the body to wear like a sash.
4. Make the Air Nomad brooch
This addition to the costume is a great way to keep wrap and shirt in place.
To make the brooch, cut a circle from a sheet of craft foam. Then, cut the swirls that make the design on the disc out of a separate piece. Glue the three swirls on top of the foam circle and then, once dry, heat a sheet of Worbla — a brand of thermoplastic you can buy cheaply from craft suppliers — and place it on top. You can find out more about Worbla and how to use it here.
Cut a circular piece of Worbla a little larger than the foam brooch then fold it over the edges, as seen in the pictures below. Once it’s set, hot-glue pin backs to the reverse. “The brooch covers the seam on the shoulder [Aang’s is apparently seamless],” says Harriet. “And safety pins instead of pin backs would work the same if you prefer.”
5. Make the belt
To craft the belt, first measure the circumference of your waist. Cut two rectangles from a piece of maroon or burgundy fabric to this length, at a width of approximately 10cm, following the first of the two patterns below.
If you wish to include the Avatar Cycle element symbols embroidery on your belt, you should do it now before your belt is stitched together. Embroider just the front piece of fabric in a contrasting yellow stitch.
“I sewed the pattern left to right, so it goes backwards when I wear it,” says Harriet. “Embroider right to left if you want to avoid this.”
Next, add interfacing to the back part of the waist piece to make the belt more rigid, then sew the pieces of fabric together, using the same method you followed for the sleeve segment. Make sure that if you’ve embroidered your belt, this piece is facing inwards when you sew the pieces together so that when you turn the waist piece inside out, the elements are on the right side. Also, make sure your interfacing is on the outside when you start to sew so this ends up on the inside.
Next, cut four rectangles from the same fabric of the same width, but to a length that is the same as your waist-to-knee measurement. Sew two of the pieces of fabric together around the edges, again using the sleeve segment method from Step 2. You’ll attach these pieces to either side of the first part of the belt — the waist section. These are the belt ties that sit at the side and fall down the leg.
To make the piece that falls from the belt, use a brown tweed-like fabric like the one you can see in Harriet’s pictures and follow the pattern below:
Cut it to a width of approximately 15-20cm. Once you’ve sewn the pieces together, stitch it to the back of the belt so that it sits centre-front.
6. Add the finishing touches
Harriet recommends buying a bald cap kit online if you want to avoid cutting your hair. She used a Mehron kit, which comes with makeup to finish the look. For Aang’s blue arrow tattoos, Harriet suggests pale blue Snazaroo face paint.
WIKI FACT: “The arrow tattoos that run down an Air Nomad’s chi paths signified their mastery of airbending. The design was an emulation of the natural arrows on the heads of flying bisons, the original airbenders and animals revered by the Air Nomads. Apprentice airbenders had no tattoos, as they received their markings after passing the thirty-six levels of airbending, or slightly earlier if they create a new airbending technique. The attainment of these tattoos was revealed during a public ceremony.”
For Aang’s trousers, Harriet wears brown joggers for comfort, which you could push up to the knee for the ballooning effect of the Avatar’s pants. Aang doesn’t wear footwear during his battle with the Fire Lord, but for practicality, health, and safety, it’s a good idea to incorporate his boots into your costume. Harriet recommends using knee-high brown boots as a base.
“Paint the red stripe down the front,” says Harriet. “I’d recommend Angelus paint as this won’t crack or flake. Alternatively, wrap the boot in cling film and duct tape, then carefully remove to make a pattern for a boot cover.”
Harriet wears a chest binder underneath her costume that she hides with a flesh-coloured undershirt.
And there you have it: how to create Aang cosplay. Happy bending!
Share your Aang cosplay pictures with us @getfandom. Follow Harriet on Instagram: tipsy_pig.
Additional reporting by S. Harriet Rhodes