In our last installment, we let you know how you can be totally awesome at writing guides. Now, we want to move on to the next step: editing and contributing. The difference between the two is very minor, and we believe that in order to be successful, knowing how to do both makes you a far more well-rounded community member! Editing is where one member finds something that other members have put together that are in need of some extra help. There are many reasons for editing what others have created before you: the information is now outdated by game changes; the original contributor is not a native English speaker who other community members can aid with getting his or her point across; the original contributor has fantastic ideas, but isn’t really a writer, or maybe they just forgot a comma. A contributor is a community member who is a content creator. They are your guide writers, the players who have updated your favorite wikis with new information before others, and those comfortable with page creation. We absolutely encourage you to feel welcome doing both!

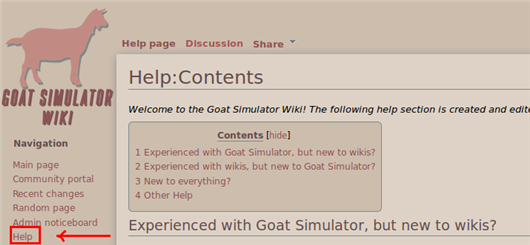
The Getting Started page on the Help Wiki is similar information to what you’ll find on an individual wiki’s Help:Contents page, or help page for short. The reason why we have this information on its on page on the Help Wiki is because not all wikis have a help page, but we do want to make sure this information is available for anyone who wants to get started. Anytime you want quick access to this information, check the left navigation sidebar on your favorite wiki to see if it has a section under Navigation that says Help. Clicking this will bring you to that wiki’s Help:Contents page.
The purpose of this page is to give you a quick overview on becoming an editor and is designed for folks who are either only familiar with wiki editing, only familiar with games, or are completely new to everything at the same time. Before you start, you’ll want to have a Curse account. It’s free! Sign up or log in with your account, and make sure you log in whenever you’re editing. Some wikis require accounts and do not allow for anonymous editing. You will also be able to keep track of what you’re doing when you’re logging in each time you edit!

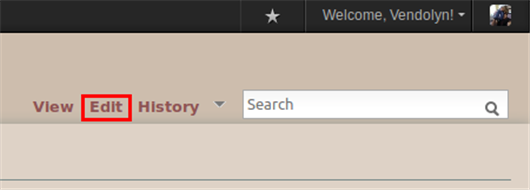
Once you’re logged in, if your favorite wiki doesn’t allow for anonymous editing, you’ll now see an Edit tab. View is to navigate back to the page you were looking at and History is where you can see the edits log for that page. Here, you can compare previous versions and even reset a previous version to the current version of the page. We’ll get more into that later. For now, let’s talk about the Edit tab and editing!

For this example, we’re looking at the FINALLY page for Goat Simulator achievements — feel free to go to the page and have a look at it for yourself! There are a few things to look at on this page. Starting at the top, you’ll see the title of the page. Under that, on the left, there are three tabs: Wikitext (where you make your edits), Preview (where you can see what changes you’ve made before saving), and Changes (which currently just shows what templates are on a page and you can edit them from there). To the right of that are the Publish and Cancel buttons. These do exactly what their names imply. Previewing before you publish or save will keep you from having to fix any minor mistakes that can occur and ultimately save you tons of time!
Below those are editing tools and the editing box. The tools are helpful, especially if you’re starting out, or maybe you can’t remember if you need ” or ”’ around words you want to bold. The tools area is where you also upload files for your page, such as images. For more tools, clicking Advanced will give you a second line for tools. Special Characters does just that: a list of special characters will appear to help you get the spelling correct, whether it be a fantasy name or a word in another language. Clicking on Help will pull up a window in the tools area with basic wiki syntax, including tips like ”’ around a word will make it bold!

At the bottom of the page, there are a few more options to become familiar with before finishing up your edit. First, you’ll notice the word Summary with a long input box next to it. Don’t be shy about using this! Try to be as concise as possible, as other editors will read these notes. Someone might not understand why a change was made, but the Summary area is where you let others know why you made that change! Below Summary are two options you can tick: This is a minor edit, and Watch this page. Selecting a minor edit is for when you’re doing a small change, like adding in a comma or spacing after a period. Selecting Watch this page will send you notifications when changes to the page has been made. At the bottom, you have another chance to preview any changes you’ve made, to see what changes you’re doing and to save what you’ve done. Become BFFs with Preview — you won’t be sorry!
If you need more help than what is offered in the help menu while editing, there are quite a few more resources that can help you finish what you want. For more syntax assistance, the Help Wiki Editing page has all of the basics at a glance. For more advanced tips, the Contents page offers everything you can find on the Help Wiki in one place! Another great place to look for tips on how to do certain things is by looking at the wiki markups others have made before you. Looking at their code is a great way to learn! Lastly, for any questions you might have, please know that Gamepedia staff and community members are always available in our IRC channels.
Now that you’re totally a wiz at wiki editing, which wiki are you dying to help out on? We hope you’ve found this informative and that it gave you what you need to become comfortable with editing. Stay tuned for next time, when we dive into pages! You’ll learn how to create, add, move and delete pages. Is there a subject in the Help Wiki you’d like to see featured as a Help Wiki Highlight? Let us know!
